This is the fourth installment in guest blogger Steve Lagudi’s series on miking drums – today, part one of a two-part post about snares. If you missed his latest post on miking kick drums, you can read it here. Typically, people do a top and bottom mic. This is fine, but I do two top mics and a bottom. Why? Generally most engineers like to double mic a lot of important instruments, like kicks (other than myself), guitars and bass (di & mic) so they can blend different types of mics such as dynamics and condensers to achieve different tones. The other reason, which not a lot of folks realize, is that this helps bring out the snare further in the mix. A snare drum, I think, is pretty important to any mix and style of music. So having the additional mics makes it easier to get the snare to sit more up front in the mix without having to gain it way up or add in compression and crank up the make-up gain. Snare top I like to use two dynamic mics. Yes, I know I said that I use condensers on all the drums, but for the snare top, I like dynamics. I use two ATM23HE’s. Sadly, Audio-Technica stopped making this mic, I’ll never understand why as I think this is the best snare mic out there. It is a hypercardiod mic, which eliminates a lot of bleed. The two top mics are placed right out over the edge of the drum, aiming towards the middle – this is different than the text book approach of having the mic aimed from the top right towards the center of the drum. I find with these mics, in this position, I get an even coverage of the drum. From 200Hz – 4Khz I get a really nice natural sound. Just the two top mic’s by themselves will sound a bit boring, but this is where the snare bottom mic comes in. On the bottom I use a condenser mic, the ATM450. This mic gets placed literally right up to the metal snares on the bottom. I like to get as dead center as possible (this can be very difficult with large drum kits, but do the best you can and remember, try and avoid placing mics that will get in the way of the drummers performance). By doing so, this gives you more than enough of the snare sound and crack, then I’ll bring up the gain on the channel to where it’s a nice blend for my taste.
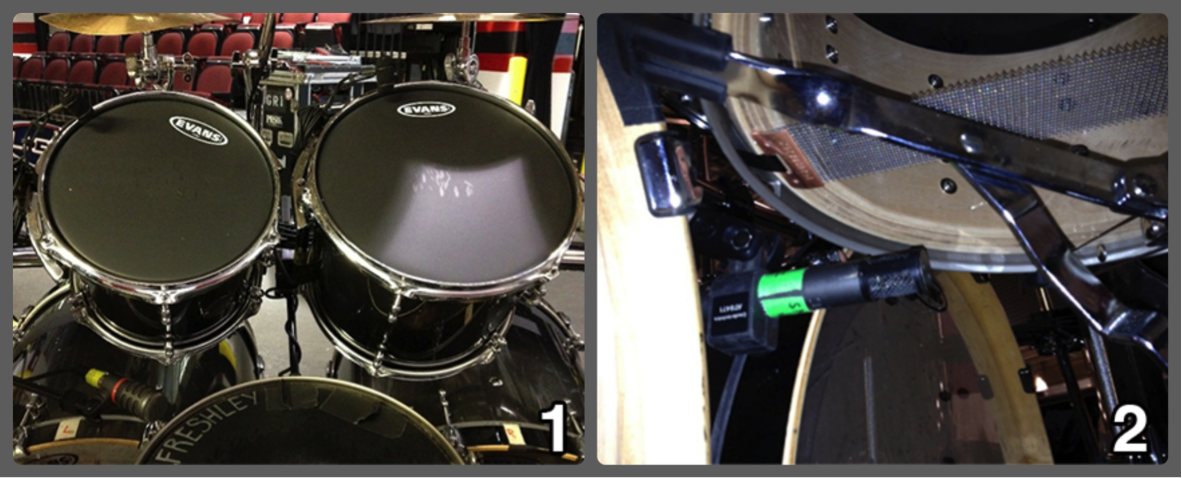 Image 1: Snare Top & Rack Tom Mics – this picture shows the placement of the 1st snare top mic. The 2nd, which was not placed at the time the picture was taken, gets mounted right in between the two rack toms and is pointed the same as the 1st snare mic. You can also see the placement of the ATM350’s on the rack toms.
Image 2: Snare Bottom Mic – shows the placement of the ATM450 right under the snare drum snare wires.
Check back next Wednesday to read the second portion of Steve’s take on miking snare drums!