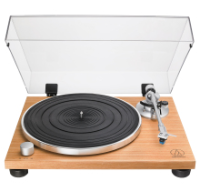
Question: How do I set up my AT-LPW30TK turntable?
Answer: Proper set up of the AT-LPW30TK turntable will ensure that it will perform at its full potential. Please follow the steps below. Do not install the dust cover at this time.
Carefully remove the turntable from the package and verify that all parts and accessories are present.
You should have the following items:
- The turntable chassis
- Dust cover and dust cover hinges
- Aluminum record platter with preinstalled rubber drive belt
- Rubber record mat
- Headshell with preinstalled AT-VM95C Cartridge
- Tonearm counterweight assembly with integrated stylus tracking force gauge ring
- 45 RPM record adapter
- Dual RCA audio cable with integrated ground wire
- AC power adapter
- Quick start guide
Setting up the turntable
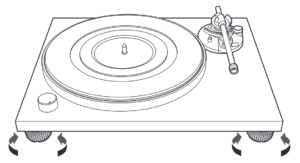
Place the turntable chassis on a firm, level surface. If the surface is not level, the turntable may be leveled by adjusting the feet on the turntable. The feet thread into the bottom of the chassis and are screwed all the way in (putting the turntable at its lowest possible height) for shipping purposes. With the aid of a bubble level, such as our AT615a Turntable Level (sold separately), adjust the feet as needed to level the turntable. Raise the height of one or more corners by supporting the weight of that corner with one hand while unscrewing the foot in a clockwise direction with the other hand.
Install the platter and drive belt
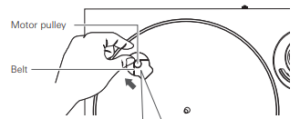
A rubber drive belt comes preinstalled on the record platter. A red ribbon inserted between the belt and the platter drive rim is used as an aid to place the belt around the brass motor pulley.
Remove the tape securing the ribbon to the platter and carefully push both ends of the ribbon through the platter opening. Carefully place the platter with the installed drive belt on the center spindle and make certain it fully seats on the spindle. Rotate the platter by hand until the opening with the red ribbon exposes gold-colored motor pulley. The motor pulley is located in the upper left corner of the turntable, opposite the tonearm. While holding the platter steady, using both ends of the ribbon, stretch the belt over the motor pulley. Once the belt is seated in the pulley’s groove, verify that the belt is not twisted and discard the ribbon.
Place the rubber record mat on the platter.
Setting up the tonearm assembly
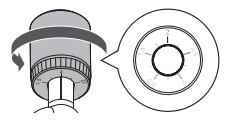
Remove the twist tie and foam wrap used to protect the tonearm during shipment then secure the arm to its rest with the locking clamp. Attach the headshell/cartridge assembly by inserting it into the socket at the end of the tonearm. While holding the headshell in position, rotate the headshell locking ring counterclockwise (to the left). As the ring rotates, it pulls the headshell into its seated position. Hand tighten the ring until it is snug.
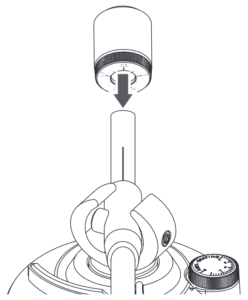
Install the counterweight (with integrated stylus tracking force gauge ring)
With the tracking force gauge ring end of the counterweight facing toward the front of the turntable, attach the counterweight to the back of the tonearm by rotating the weight in a counterclockwise (to the left) direction. As the weight rotates, it will thread onto the arm. Thread the weight onto the arm about halfway at this time; final adjustments will be made in the next step.
Balancing the tonearm and setting the tracking force
CAUTION: Do not drag the cartridge’s stylus across the platter or record mat while adjusting the tonearm’s balance or setting the tracking force. Doing so may damage the stylus assembly!
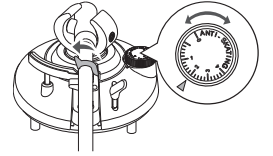
Make certain that the anti-skate adjustment is set to “0” (no compensation) before proceeding.
Carefully remove the stylus protective cover by sliding it straight forward off the front of the cartridge, exposing the stylus. Try not to pull down on the protector, doing so may dislodge the stylus assembly from the cartridge body.

While gently holding the sides of the headshell to stabilize the tonearm, release the tonearm locking clamp to allow the tonearm to swing freely. Continue to stabilize the tonearm while rotating the counterweight in the direction needed to balance the arm in the horizontal plane. Check for balance by temporarily releasing the headshell after each adjustment of the weight. Ultimately, the arm should float freely just above the tonearm rest – not touch the rest. A properly balanced tonearm will float parallel to the turntable chassis. Once the arm is balanced, place it into the arm rest and secure it using the locking clamp. Be careful not to rotate the counterweight while doing this.
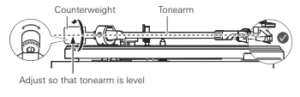
To set the proper stylus tracking force for the provided AT-VM95C cartridge, first locate the black stylus force gauge ring that is semi-attached to the front of the counterweight. Marked with numbers and lines indicating different tracking force values, the ring can be rotated independently of the weight. Without turning the counterweight itself, carefully rotate the ring until the “0” on the ring lines up with the centerline marked along the top of the tonearm. Your tonearm is now properly balanced and calibrated so you can accurately set the tracking force for the stylus. The recommended tracking force for the provided AT-VM95C cartridge is 2.0 grams. To set the tracking force, rotate the counterweight, along with the ring, in the counterclockwise (to the left) direction and stop when the “2” on the ring lines up with the centerline marked along the top of the tonearm. Note that the ring turns with the weight as you are rotating the weight. The numbers on the ring should be going up in value as you rotate the counterweight if you are turning the weight in the right direction.
Set the anti-skate adjustment
Set the anti-skate adjustment to the same value as the tracking force, in this case this is 2.0.
Setting up audio and power connections
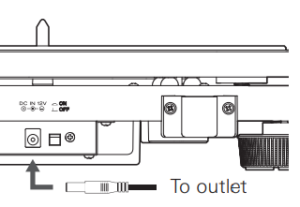
Connect the AC power adapter cable to the 12V DC power input jack on the rear of the turntable then plug the adapter into a convenient AC outlet. Note that the main power switch is located on the rear of the turntable next to the power input jack and may be left in the on (pressed in) position.
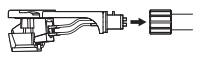
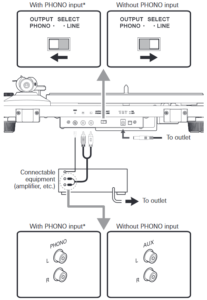
Next, connect the provided dual RCA audio cable to the left and right output connectors on the turntable. The RCA cable’s red plug is the right (R) channel and the white plug is the left (L) channel. The turntable can provide either a traditional unequalized PHONO level output or an equalized LINE level output making it compatible with a variety of devices, including those with or without a dedicated PHONO input for a turntable.
Connecting to PHONO input jacks
If your device has PHONO input jacks on it, connect the turntable to these jacks using the provided dual RCA audio cable. Set the “PHONO-LINE” selector switch located on the rear of the turntable to PHONO, which turns off the turntable’s internal preamplifier. Attach one end of the audio cable’s integrated ground wire to the ground lug on the turntable and the other end to the ground lug on the device. See the With PHONO input illustration below.
Connecting to AUX, AUDIO IN, or other LINE level input jacks
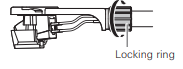
If your device does not have PHONO-type input jacks, the turntable may be connected to other types of inputs such as AUX, AUDIO IN, LINE, CD etc. Set the “PHONO-LINE” selector switch located on the rear of the turntable to LINE, which turns on the turntable’s internal preamplifier. Note that if the switch is set to PHONO when connected to these type of inputs, you may have little to no sound. When the preamp selector switch is set to LINE, the ground wire connection is not required. See the Without PHONO input illustration above.
Install the dust cover
Install the dust cover hinges into the slots on the dust cover. Install the cover on the turntable by inserting the hinges into the slots on the rear of the turntable.
The entire setup process may be viewed in the following video.