Question: How do I set up my AT-LP7 turntable?
Answer: Carefully unpack the AT-LP7 turntable and familiarize yourself with its parts and accessories.
You should have the following items:
- Turntable body
- Dust cover
- Record platter
- Drive belt
- Headshell with preinstalled stereo phono cartridge
- Counterweight
- 45 RPM adapter
- Dual RCA audio cable with ground wire
- AC power adapter
- User manual

Turntable Assembly:
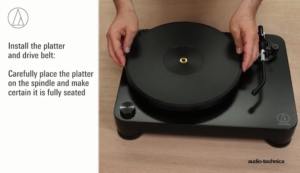
Install the platter and drive belt. Carefully place the record platter on the center spindle and make certain it becomes fully seated on the spindle. Slip the drive belt around the platter and gently attach it to the exposed motor pulley. Make certain that the belt is not twisted.
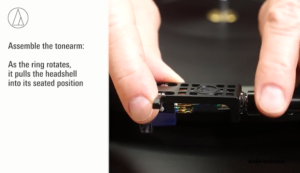
Assemble the tonearm. Remove the twist tie and temporarily secure the tonearm to its rest with the locking clamp. Attach the headshell with preinstalled cartridge by inserting it into the tonearm socket. While holding the headshell in position, rotate the headshell locking ring counterclockwise (to the left) to draw the headshell into the socket and continue rotating the ring until it is snug.
Install the counterweight on the rear of the tonearm with the black stylus force gauge dial facing the front of the turntable. As you rotate the weight counterclockwise (to the left), it will thread onto the arm.

Calibrate (balance) the tonearm, set the tracking force and set the anti-skate for this specific cartridge. This important process allows the cartridge to track the record properly, provides the best fidelity possible, and the least amount of record and stylus wear.
Set the anti-skate control dial to zero (“0”). Make certain that the flip-down stylus guard is lowered to protect the delicate stylus assembly. While gently holding the headshell to stabilize the tonearm, carefully release the clamp securing the tonearm to the rest.
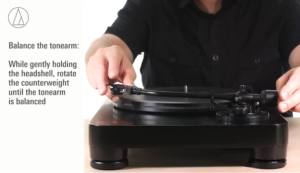
At this point, the tonearm is unbalanced and can easily swing. Be careful not to drag the stylus across the record platter. While gently holding the headshell, rotate the counterweight in the direction needed till the arm is horizontally balanced. Note that rotating the weight counterclockwise (to the left) causes the weight to move forward on the arm, adding more weight to the cartridge end of the arm and causing the arm to go down. Rotating the weight clockwise (to the right) causes the weight to move backwards on the arm, reducing the weight on the cartridge end of the arm and causing the arm to go up. When it is perfectly balanced, the arm should hover freely above the platter and not touch the platter’s surface. Once the tonearm is balanced, without touching the counterweight, carefully move the tonearm to its rest and secure it using the tonearm clamp.
Set the tracking force. Every phono cartridge comes with a recommended stylus tracking force range. For the provided VM520EB cartridge, the range is from 1.8 to 2.2 grams. 2.0 grams is optimal.
Locate the black stylus force gauge dial on the front of the counterweight. Marked with numbers and lines indicating different tracking forces, the dial can be rotated independently of the counterweight itself. Without turning the counterweight, carefully rotate the stylus force gauge dial until the “0” on the dial lines up with the centerline marked on the top of the tonearm, just behind the tonearm pivot. Now set the actual tracking force by rotating the counterweight assembly (not just the dial) counterclockwise (to the left), stopping when the number 2.0 on the gauge lines up with the centerline marked on the top of the tonearm. Note that the stylus force gauge dial rotates with the rotation of the counterweight.
You have now set the proper tracking force for the provided VM520EB cartridge. If you ever change out the cartridge, remember you will need to rebalance the tonearm, zero the dial, then set the tracking force to the value required by the new cartridge.
![]()
Set the anti-skate. An anti-skate control on the AT-LP7 turntable applies a small outward force to compensate for the natural skating force which pulls the tonearm toward the center of the record during play. This force is highest near the inner grooves of the record. For best results during normal operation, set the ant-skate control to the same value as the cartridge tracking force.

Tonearm height. When properly set up, the tonearm will be parallel to the record during play. If the rear part of the arm is too low or too high, a tonearm height adjustment located at the base of the arm pivot allows the arm to be raised or lowered. To make an adjustment, first release the tonearm height adjust locking lever, then rotate the large height adjustment dial in the direction needed to level the arm. When the arm is level it should also be parallel to the record, ensuring that the proper tracking angle for the stylus is achieved. Place the height adjust locking lever back into its locked position.

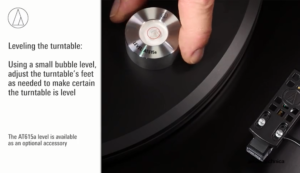
Level the turntable. For best performance, the turntable body should be level. Using a small bubble level, adjust the turntable’s feet as needed to make certain it is level. Note that the feet are threaded into the body and come screwed all the way in for shipping purposes.
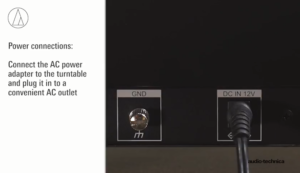
Power connections. Connect the provided AC power adapter to the power input jack on the rear of the turntable, then into a convenient AC power outlet.
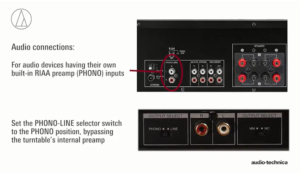
Audio connections. The AT-LP7 turntable provides a traditional phono output along with a built-in magnetic phono preamplifier providing an RIAA equalized line level output. This makes it compatible with traditional PHONO inputs on stereo amplifiers and receivers, along with Aux or Line-level inputs on powered speakers, amplifiers and other equipment.
If your audio device has its own RIAA magnetic phono preamplifier, simply set the “Phono – Line” output selector switch on the rear of the turntable to “Phono” to bypass the turntable’s internal preamplifier.
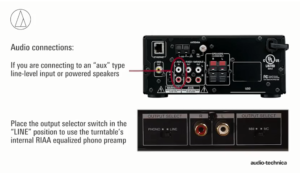
If you are connecting to an Aux-type, line-level input or powered speakers, place the selector switch in the Line position to use the turntable’s internal preamplifier.
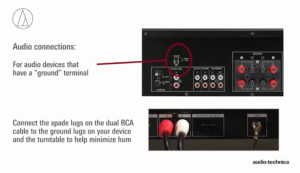
If your audio device has a separate “ground” terminal, connect the spade lug on the dual RCA cable to the ground to help minimize hum.
Cartridge-type setting. The AT-LP7 turntable may be used with Moving Magnet (MM) or Moving Coil (MC) phono cartridges. Preferred by some audiophiles for their higher fidelity, optional moving coil cartridges are available from Audio-Technica. For moving magnet cartridges, including the VM520EB model provided, make certain the cartridge selector switch on the rear of the turntable is set to the Moving Magnet (MM) position.

Dust cover. The provided dust cover is designed to protect the turntable when not in use and should remain off when records are playing.
The entire setup process may be viewed in the following video.