This is the eighth installment in guest blogger Steve Lagudi’s series on miking drums – today, Part 2 of a two-part post about cymbals, hi-hats and rides. If you missed Part 1, you can read it here.
For the hi-hats, (I say hi-hats because I have several drummers that use more than one) I use the AE5100. This gives a really nice accurate reproduction. Aside from acoustic guitars in the studio, the AE5100 just owns on the hi-hat.
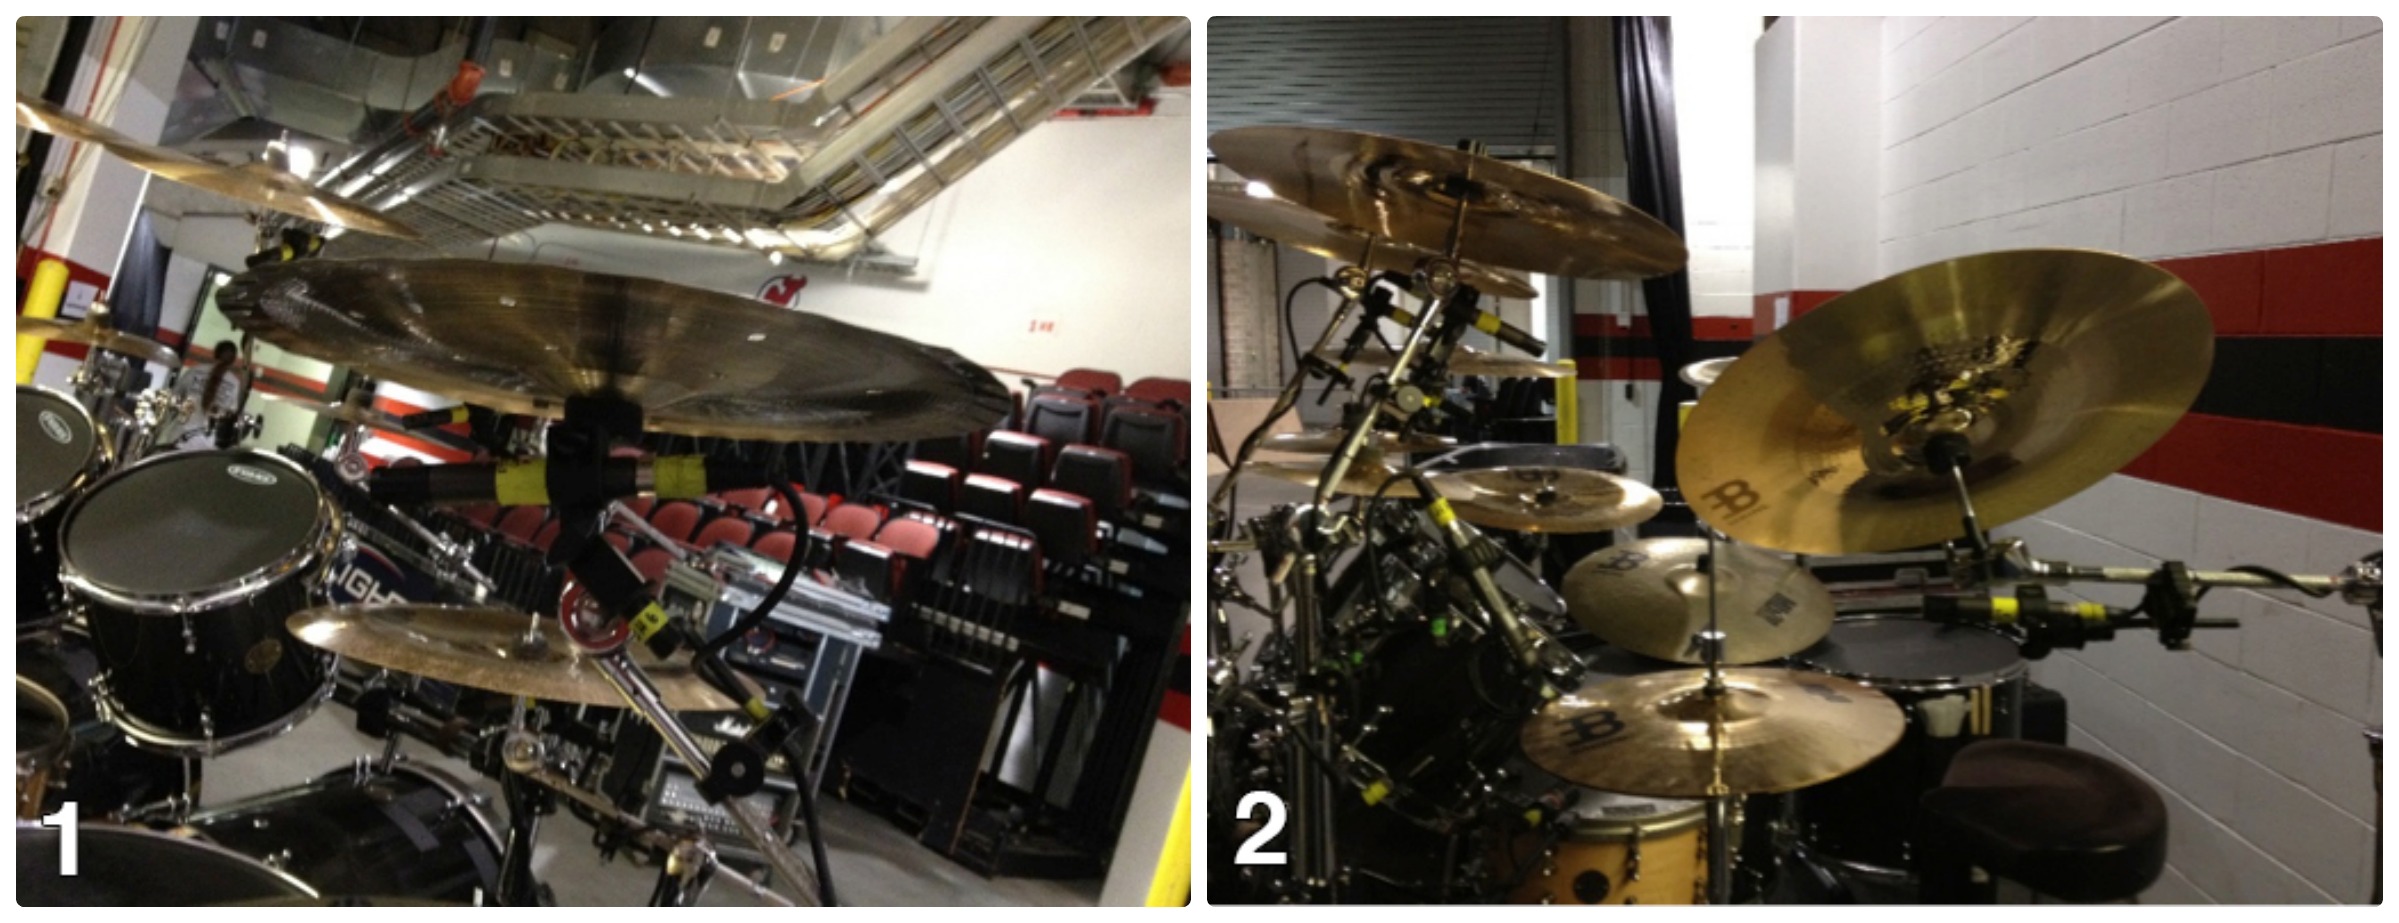 Image 1: Cymbal Spot Mics – shows the placement just underneath the cymbals. Take note of the angle, this offset angle eliminates the cymbals from sounding “washy”, and prevents a flanging effect from the cymbal moving back and forth from the diaphragm.
Image 2: Cymbal Spot Mics & Hi-Hat Mics – Shows the placement of the Hi-Hat & additional cymbal spot mics.
Treatment of these mics is pretty straight forward and easy. I roll them off between 200-300Hz. Depending upon the cymbal, I might have to go in and pull out a few Db here and there of some nasty frequencies. Otherwise pretty much flat almost all the time. Gain, I just match the gains of each channel. Since the mics are placed in the same spot you have the consistency with the mic placement and as a result you retain dynamics, with each hit by the drummer being accurately reproduced. For treatment of dynamics on the cymbals and ride, I will use compression when I am on the digital consoles. Same thing as before, 2:1-3:1 ratios, medium attack with medium/slow release times. This helps give more sustain to the cymbals while smoothing them out. I find it adds a nice, smooth shimmery top end to the cymbals, and they won’t be too loud or too up front.
The hi-hat is unlike the other drums and cymbals. This is where I apply a lot more compression. The hi-hat is the most dynamic part of the kit, so to help smooth that out, I add a healthy amount of compression. I start with 3:1 ratio, but find I end up being in between there and 4:1. I have a pretty fast attack and slow release. I don’t make it pump or sound over compressed, it just really smoothes it out, especially when it’s being bashed, I find the compressor does its job by riding all those hits.
One thing I want to mention about the cymbal mics…there will be times when you’re in smaller venues where you might be limited on channels and in those cases, you can use Y cables to double up channels. A lot of you may be thinking, or have heard this from house engineers: “You don’t need overheads in this room.” Despite house people telling me that, I still go ahead and do my own thing. They do not know my approach and what I am looking to achieve with the spot mics. So how can they tell me not to do something when they don’t even know what I am doing? Thanks for the advice, but I do what I do for a reason. Now, we don’t have a lot of gain on the mics and I tuck them nicely underneath the mix, so you will notice that they just add a little bit of definition and clarity to the mix. So, the moral of this tip? Do what you want to do. It’s your mix, you’re at the console, you know what you’re looking to achieve, don’t let anyone stop you. Being told not to do this or that is silly, that’s like someone going up to the band and telling them, “Oh you should not play this chord or that chord because it won’t sound good in this room.” C’mon!
Image 1: Cymbal Spot Mics – shows the placement just underneath the cymbals. Take note of the angle, this offset angle eliminates the cymbals from sounding “washy”, and prevents a flanging effect from the cymbal moving back and forth from the diaphragm.
Image 2: Cymbal Spot Mics & Hi-Hat Mics – Shows the placement of the Hi-Hat & additional cymbal spot mics.
Treatment of these mics is pretty straight forward and easy. I roll them off between 200-300Hz. Depending upon the cymbal, I might have to go in and pull out a few Db here and there of some nasty frequencies. Otherwise pretty much flat almost all the time. Gain, I just match the gains of each channel. Since the mics are placed in the same spot you have the consistency with the mic placement and as a result you retain dynamics, with each hit by the drummer being accurately reproduced. For treatment of dynamics on the cymbals and ride, I will use compression when I am on the digital consoles. Same thing as before, 2:1-3:1 ratios, medium attack with medium/slow release times. This helps give more sustain to the cymbals while smoothing them out. I find it adds a nice, smooth shimmery top end to the cymbals, and they won’t be too loud or too up front.
The hi-hat is unlike the other drums and cymbals. This is where I apply a lot more compression. The hi-hat is the most dynamic part of the kit, so to help smooth that out, I add a healthy amount of compression. I start with 3:1 ratio, but find I end up being in between there and 4:1. I have a pretty fast attack and slow release. I don’t make it pump or sound over compressed, it just really smoothes it out, especially when it’s being bashed, I find the compressor does its job by riding all those hits.
One thing I want to mention about the cymbal mics…there will be times when you’re in smaller venues where you might be limited on channels and in those cases, you can use Y cables to double up channels. A lot of you may be thinking, or have heard this from house engineers: “You don’t need overheads in this room.” Despite house people telling me that, I still go ahead and do my own thing. They do not know my approach and what I am looking to achieve with the spot mics. So how can they tell me not to do something when they don’t even know what I am doing? Thanks for the advice, but I do what I do for a reason. Now, we don’t have a lot of gain on the mics and I tuck them nicely underneath the mix, so you will notice that they just add a little bit of definition and clarity to the mix. So, the moral of this tip? Do what you want to do. It’s your mix, you’re at the console, you know what you’re looking to achieve, don’t let anyone stop you. Being told not to do this or that is silly, that’s like someone going up to the band and telling them, “Oh you should not play this chord or that chord because it won’t sound good in this room.” C’mon!
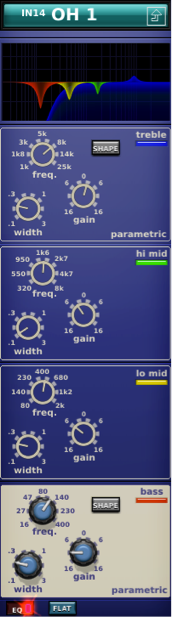 Cymbal EQ – EQ setting along with the high & low pass filters.
Up next – the last installment of Steve’s tips on miking a drum kit…he finishes the series out talking about channel delay. Look for the post one week from today!
Cymbal EQ – EQ setting along with the high & low pass filters.
Up next – the last installment of Steve’s tips on miking a drum kit…he finishes the series out talking about channel delay. Look for the post one week from today!
Published
12th March 2014