This is the tenth and final installment in guest blogger Steve Lagudi’s series on miking drums – today, Part 2 of a two-part post about channel delay. If you missed Part 1, you can read it here.
For drums, I like to take it even further than that. Without question, the snare is the loudest part of the drums. With the snare mics picking up the signal before any of the other mics, you are obviously having phase and timing issues. After I adjust the timing to all the snare mics, one trick that I like to do is to delay the snare to all the cymbal mics. Having the tracks recorded in the computer really helps to get this as accurate as possible, but like I said, you can just use your ears. Once you do it, you will be amazed at how incredible the drums sound now that they are time aligned. When I first started messing with it, I was blown away. You can also do this if you run two mics on kicks by delaying the inside mic to the sub kick mic.
As with everything I am interested in, I like to dive in deep. Once I was finished toying around with the drums I thought, “Why stop there?” Another really amazing way to use channel delay is with vocals. Vocals on the stage are usually sitting a few feet out in front of the drum kit. If you stage left and stage right vocals, these are usually in front of screaming guitar amps. Since the vocals are sitting on top of all the music, you’re obviously raising up the noise floor and causing all that stage bleed to be brought of out of the mics. There are time and phase issues with that. The vocal mics are getting the guitar/bass and drums arriving at a later point, so why not delay those instruments to arrive at the same time as the vocal mics?
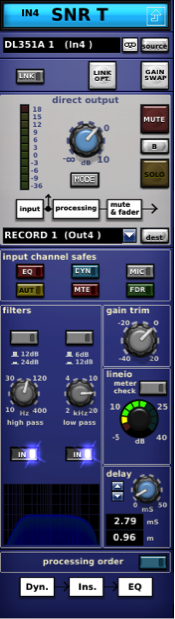 Channel Delay – in the bottom right hand corner, the snare is being delayed. This feature can be found on almost every digital console.
The first time I did this, it was as if I had a whole new mix going on. The clarity and depth was just so unbelievable to me. Once you have the chance to do this to your mix, you won’t ever want to not be able to do it ever again. Why go back to the old way of mixing? Now just for the record, I am not the one who discovered this – like everything else, it was handed down to me from other engineers. I just applied it to use with my own projects.
Now for you studio folks, you can do the same thing by moving the tracks around in your DAW. I use Protools, but this works in any recording program. The best way to do it is find a single snare drum hit. Go to all your other tracks, zoom in as close as possible and drag all the drum tracks so that they line up with the hit. This will pretty much work most of the time, but for tracks like room mics that are far away, it’s best to keep them where they are. You might need to nudge the tracks here and there to be slightly behind the snare hit, so just spend a few minutes adjusting things ‘til it sounds best to your ears.
A little while ago, a major manufacturer of plug-ins came out with a phase and time adjusting plug-in that works amazingly for aligning tracks. It can also be used on live consoles or with laptops to run plug-ins with consoles. So the technology is out there and for those of you who do not have that technology, you’re not alone, you can still achieve the same results.
Thank you for reading this, I hope you can walk away with a few new tips and tricks that you can apply to your mixes. Just keep in mind, all these techniques are what works for me. You might find they do not work for you, and that is ok. It is all about what works for your project. There is no right or wrong way, it all boils down to what sounds best for you, the artist & most of all, the listeners!
Channel Delay – in the bottom right hand corner, the snare is being delayed. This feature can be found on almost every digital console.
The first time I did this, it was as if I had a whole new mix going on. The clarity and depth was just so unbelievable to me. Once you have the chance to do this to your mix, you won’t ever want to not be able to do it ever again. Why go back to the old way of mixing? Now just for the record, I am not the one who discovered this – like everything else, it was handed down to me from other engineers. I just applied it to use with my own projects.
Now for you studio folks, you can do the same thing by moving the tracks around in your DAW. I use Protools, but this works in any recording program. The best way to do it is find a single snare drum hit. Go to all your other tracks, zoom in as close as possible and drag all the drum tracks so that they line up with the hit. This will pretty much work most of the time, but for tracks like room mics that are far away, it’s best to keep them where they are. You might need to nudge the tracks here and there to be slightly behind the snare hit, so just spend a few minutes adjusting things ‘til it sounds best to your ears.
A little while ago, a major manufacturer of plug-ins came out with a phase and time adjusting plug-in that works amazingly for aligning tracks. It can also be used on live consoles or with laptops to run plug-ins with consoles. So the technology is out there and for those of you who do not have that technology, you’re not alone, you can still achieve the same results.
Thank you for reading this, I hope you can walk away with a few new tips and tricks that you can apply to your mixes. Just keep in mind, all these techniques are what works for me. You might find they do not work for you, and that is ok. It is all about what works for your project. There is no right or wrong way, it all boils down to what sounds best for you, the artist & most of all, the listeners!
Published
26th March 2014