Published
6th February 2018
This installment of our blog series on Basic Audio Techniques for Video explains four approaches for miking audio inside of a car. If you missed the previous installment explaining the basics of working wireless mic systems, you can read it here.
When recording a conversation inside a car, there are several options to achieve great-sounding audio. Whether you’re looking to capture a conversation between two passengers or a phone call taking place inside the vehicle, there are several types of microphones and placements available to capture the best dialogue and avoid picking up excess noise.

4 Techniques for Miking Inside of a Car
1. Use an Overhead Boom for Convertibles or Vehicles with Open Sunroofs
If you’re trying to capture audio inside a convertible or a vehicle with an open sunroof, a good option is to use an overhead boom. This method works best when the vehicle is stationary or being carried on a low-slung flatbed process trailer. To ensure the best audio, always use a windscreen; however, even when using a windscreen, wind can still be a factor in capturing accurate audio.2. Use Under-Wardrobe Lavaliers or a Short Shotgun Mic to Capture Front-Seat Conversations
To capture a conversation between two people in the front seat or a conversation taking place on a cell phone, you have a few options to ensure high-quality audio, while making sure the microphone isn’t in the video shot. Your first option is to have passengers wear lavaliers under their wardrobes. To do so, you can place the lavalier mic beneath a collar or directly on the body beneath their clothing. Find more tips and tricks for hiding lavalier mics in our series on convincingly hiding lavalier microphones while rigging talent. However, when using lavalier mics, there are times when clothing and seatbelts may cause interference. Alternatively, you can mount a plant microphone inside the vehicle. A popular technique is to use a moderately directional short shotgun mic, such as the BP4073 or the AT4053b, in the center console area between the driver and passenger.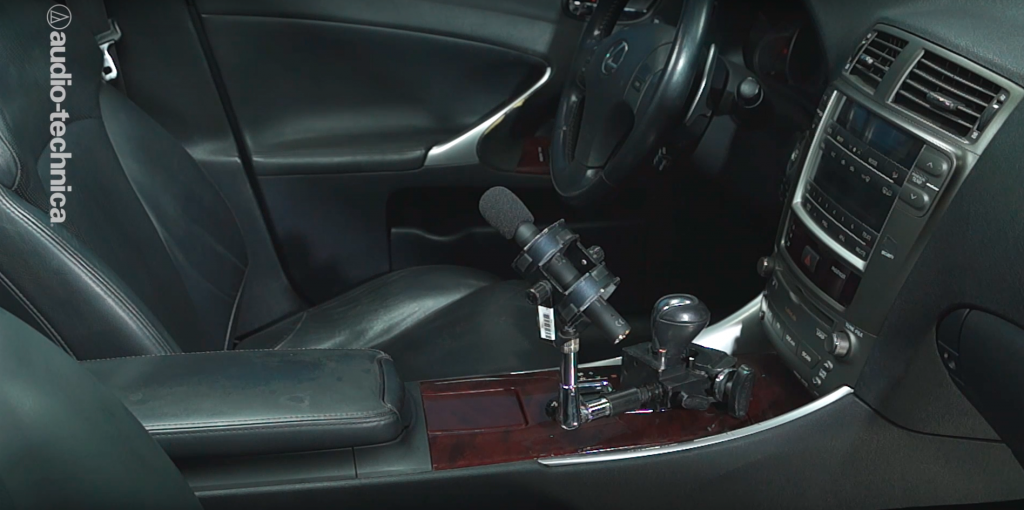 When using a short shotgun placed in the center console, there are a few things to keep in mind for producing great audio. First, recording in a vehicle with a hand brake or shifter lever will make it easier to clamp the microphone in position. A moving vehicle will produce a good amount of vibration, and gravel or debris can hit the underside of the car, all of which can affect the audio quality beyond easily filtered low bass. Therefore, always make sure you use a good shock mount in addition to the clamp.
Second, keep in mind that a single microphone will only capture audio from one person at a time, either the driver or passenger. Furthermore, depending on the camera angle, the microphone might be visible in the shot, so be cautious when filming to ensure the mic is not in frame.
When using a short shotgun placed in the center console, there are a few things to keep in mind for producing great audio. First, recording in a vehicle with a hand brake or shifter lever will make it easier to clamp the microphone in position. A moving vehicle will produce a good amount of vibration, and gravel or debris can hit the underside of the car, all of which can affect the audio quality beyond easily filtered low bass. Therefore, always make sure you use a good shock mount in addition to the clamp.
Second, keep in mind that a single microphone will only capture audio from one person at a time, either the driver or passenger. Furthermore, depending on the camera angle, the microphone might be visible in the shot, so be cautious when filming to ensure the mic is not in frame.
3. Use Lavalier Mics Under the Sun Visor to Capture Single or Multiple Voices Within the Car
If you want to achieve the most natural-sounding dialogue between a driver and passenger, try using lavalier microphones planted under the car’s sun visors. There are many benefits to this technique, including that the sun visor is just inches away from the speaker’s face, while still a maximum distance away from the noisy undercarriage of the vehicle. Additionally, both the visor and ceiling of a car are well-padded, which helps to minimize echo and further block out exterior noise. For this method, use a natural-sounding lavalier, such as the MT830R or AT899, for the best results. If your goal is to emulate a conversation taking place on a cell phone within a car, use a microphone such as the AT803 lavalier, which will produce an emphasized close-up feel when the conversation is recorded. There are a few options for placing the lavalier microphones behind the sun visors to ensure great audio and prevent the mics from being easily seen in video shots. Placing a single lavalier on either the driver-side or passenger-side sun visor will easily pick up both voices; however, you can also choose one sun visor over the other based on the camera angle or to favor a weaker voice.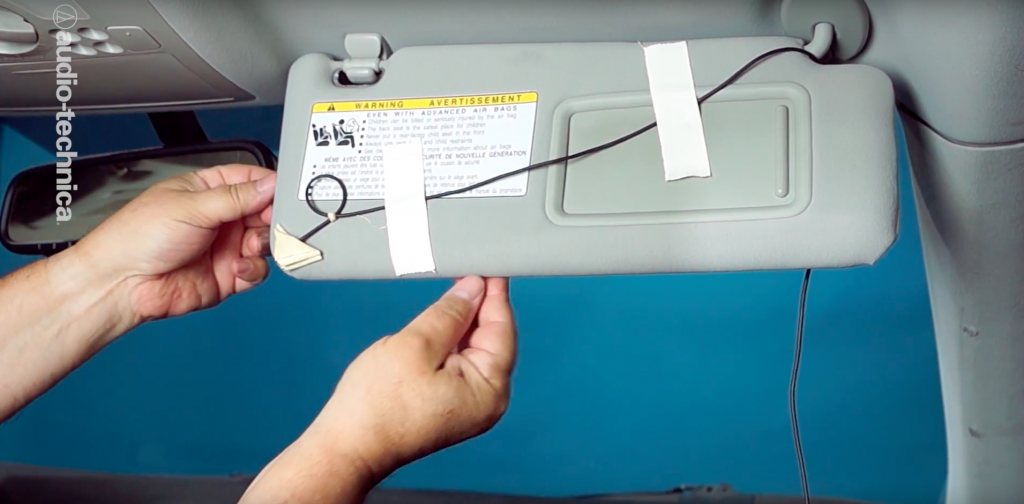 To attach the lavalier microphone to the sun visor, use the sticky triangle technique. This technique provides a large mounting surface as well as good isolation against vibration and rumble from a moving car. Remember to form a small loop behind the mic capsule to protect against vibration traveling up the mic cable. Finally, use a few strips of tape to securely anchor the lavalier and cable to the visor. If wind due to an open window or roof is a problem, you can also add a heavy-duty lavalier windscreen to the mic.
To hide the remaining cable, simply dress it along the visor arm and then along the inside edge of the windshield. Depending on the camera angle and design of the passenger compartment, you may need to either double back along the top edge of the windshield or tuck the cable along the vertical seam and down to the floor. To ensure the cable remains hidden from video shots, you can use colored cloth tape or clear tape, such as medical tape. You can also use white tape and paint it using a Sharpie or artist’s pen so that it blends in with the vehicle’s interior.
To attach the lavalier microphone to the sun visor, use the sticky triangle technique. This technique provides a large mounting surface as well as good isolation against vibration and rumble from a moving car. Remember to form a small loop behind the mic capsule to protect against vibration traveling up the mic cable. Finally, use a few strips of tape to securely anchor the lavalier and cable to the visor. If wind due to an open window or roof is a problem, you can also add a heavy-duty lavalier windscreen to the mic.
To hide the remaining cable, simply dress it along the visor arm and then along the inside edge of the windshield. Depending on the camera angle and design of the passenger compartment, you may need to either double back along the top edge of the windshield or tuck the cable along the vertical seam and down to the floor. To ensure the cable remains hidden from video shots, you can use colored cloth tape or clear tape, such as medical tape. You can also use white tape and paint it using a Sharpie or artist’s pen so that it blends in with the vehicle’s interior.